How To Make Homemade Bone Broth
Homemade stocks and broths form the backbone of healthy diets and fine cuisine. They're packed full of flavor and nutrition. Plus, they're super cheap to make, especially if using scraps and reserved bones, as we advocate below. While homemade broth making sounds impressive, it is one of the easiest things you can do in the kitchen, and it's practically foolproof: it's virtually impossible to "ruin." We guarantee once you start making your own broths, you'll never think of store-bought stocks the same. We hope that broth-making becomes a new tradition in your kitchen as it has in ours.
So, give it a try. We've put together a list of general guidelines that will help you through the process. Good luck and happy broth-making!
Rule #1: Save Your Bones
Each time you do a roast, be it chicken, beef, pork, lamb, or any other kind of meat-on-bone, be sure to save the bones that remain. Start a stockpile (no pun intended) of bones, including poultry frames (which is what we prefer to say instead of "carcass"), by throwing them into gallon-size freezer bags, and storing in the freezer. Once you have a full bag, you've got enough bones for bone broth.
Another source of bones is your local butcher or grocer. We love to use a combination of raw, smoked, and roasted bones from chicken, turkey, and pork. What kind of bones? Look for high quality chicken backs, chicken necks, chicken feet (yes!), turkey necks, or pork neck bones. Buy a few pounds, use part of the package and store the rest for the next time.
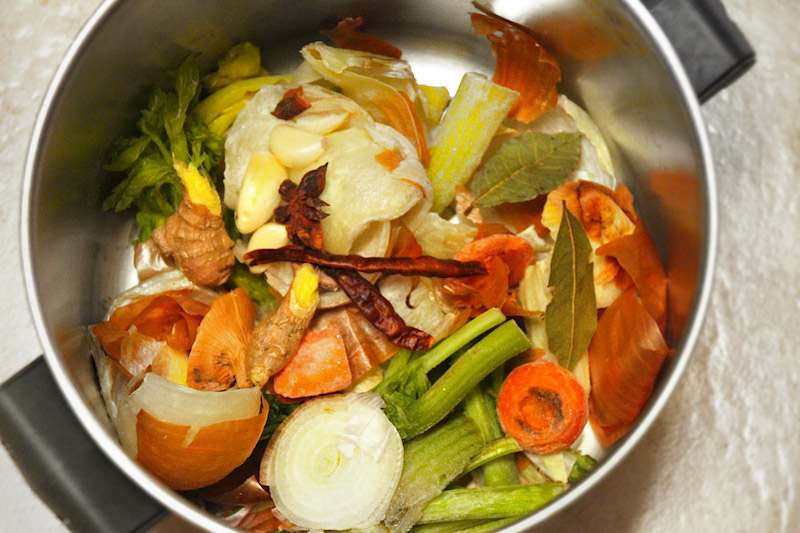
Rule #2: Save Your Veggie Scraps
Just as you've started a gallon-size freezer bag for bones, start a separate bag for veggie scraps. What kind of scraps should you use? As long as there's no mold, it's game: onion skins and ends, carrot tips, celery tips or hearts or leaves, and garlic skins. We also reserve the stems and trimmings from fresh herbs like thyme, rosemary, and parsley, and the spines from collards or kale. It is amazing how quickly a gallon bag will fill up, as long as you remember to pull the bag from the freezer when you start cutting vegetables. Try to make a habit of reaching into the freezer just as you reach for your knife or cutting board.
Rule #3: Allow Enough Time
Making bone broth doesn't require a lot of hands-on time. What it does require is a lot of time by itself on low heat. Don't plan to make a soup the same day you're making broth. Just take a deep breath and plan ahead.
Rule #4: Skim, Skim, Skim
Within the initial hour of cooking, your stock will have risen in temperature enough to be nearly boiling. During that time, you need to take about a minute of your time to skim the scum or foam that rises to the top, which contains the impurities that you don't really want to eat. (A trick for skimming: use a steamer tray or stainless collander to press the ingredients down before skimming. This minimizes the amount of veggie scraps or herbs that you might otherwise catch with the scum.) After you've gotten rid of the scum/foam, you can turn down the heat and leave it alone for hours. When you check up on it, skim it again for any fat that has congealed on the surface: it'll resemble a film that's not unlike thin plastic wrap.
Rule #5: Leave it Uncovered
The whole point of making a broth is to let the liquid reduce so it has a higher concentration of flavor and color (and vitamins and minerals). Reduction doesn't happen very easily in a covered pot, because of the steam that would otherwise be escaping the liquid remains in the same area as condensation, which falls back into the pot! So, do yourself and your broth a favor, and let it remain uncovered throughout the entire process.
Rule #6: Strain It
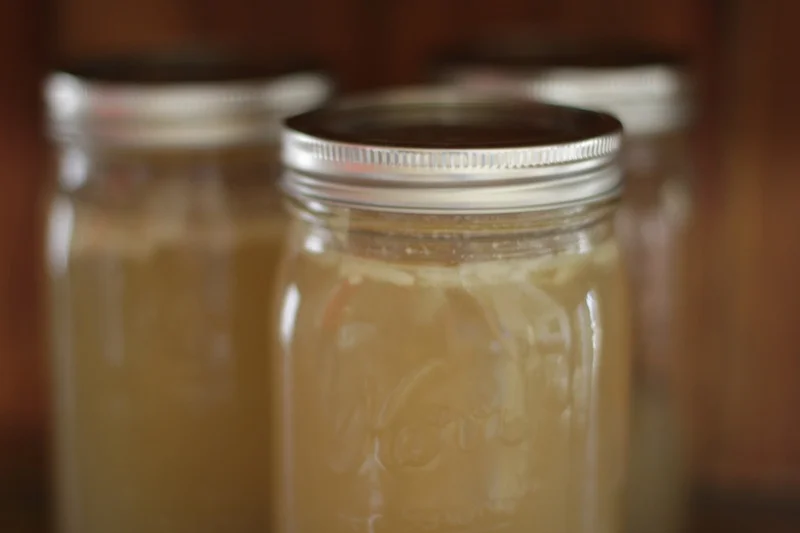
Your broth will have reduced by at least half, and will be packed with flavor, color, and aroma. The final step is to make sure to fully strain it, so you don't have any crunchy surprises (read: bone fragments) lurking in your beautiful broth. The best way to strain broth is through a fine-mesh sieve that's been lined with a double layer of cheesecloth. Why both? The sieve is strong enough to catch the bones. The cheesecloth is fine enough to catch the small sediment. Strain the broth straight into the containers you'll store it in. We like to use quart-sized mason jars, but any glass storage container is perfect.
Rule #7: Let it Cool Before it Hits the Fridge
NEVER COVER HOT STOCK. Bacteria thrive in the drops of condensation that form on the underside of a lid, and then drip back into the stock. If you're worried about things getting into your stock while you let it sit to cool, cover it with a single layer of cheesecloth, which allows the steam to escape while protecting it from any mysterious objects from dropping in.
You Did It!
Once it is cooled, you can cover your broth and put it in the fridge, which is when two things will happen: 1). the fat will rise to the top in a layer that can be easily removed with a spoon, and 2). the broth should become gelatinous, which is the sign of a good broth. If it's not gelatinous, don't be discouraged. It's still a delicious and healthy broth, just make note that next time you either need more time for it to reduce, and/or more jointed bones. Some of the best broth that we've made has been from chicken feet, which are loaded with collagen and cartilage, making some of the firmest, most gelatinous broth, once chilled.
Broth-making is not a precise science. Rather, it's an art of improvisation, requiring you to use the ingredients you have on hand.